Making a Hugo Website The Full Stack Way pt 3 - Basic Infrastructure as Code (IaC) with Terraform
In the previous tutorial, we deployed a Google Cloud Storage bucket my manually click a bunch of items in the Google Cloud website to create resources in the cloud. This is fine for a basic project, but what if we wanted to utilize more complex resources in the cloud or had multiple people working on the same project?
As we make more manual edits, it can get harder and harder to keep track of the state of our cloud infrastructure (and the associated billing!). What if we could declare our infrastructure as code so that we could requisition (and tear down) cloud resources at will? This would also helpful for project involving multiple people since a record of changes and the current state of our infrastructure will be recorded on Github for all to see. Enter Terraform.
What is Terraform?
Terraform is a tool for declaring Infrastructure as Code (IaC). Unlike other similar tools, Terraform can be used across multiple different cloud providers. It is also modular and has a declarative syntax which means that you don’t have to worry about sucessive deployments using the same code causing issues. For example, if you ask for 3 buckets, Terraform won’t add 3 more to however many there currently are. It will simply check how many buckets there currently are and either add or remove however many it takes to reach 3 buckets.
Setting up Terraform
First install Terraform for your OS.
Then create a terraform directory and sub-directories using the following command in your project root.
# No spaces!
$ mkdir -p terraform/{modules/bucket,prod}
The directory structure should look like this:
terraform
├── modules
│   └── bucket
└── prod
For security purposes, we will also want to add some Terraform specific file extentions to our .gitignore. You can copy the following .gitignore from Github
Creating a module for our static site bucket
Under modules/bucket/ create three files
$ touch main.tf variables.tf outputs.tfvariables.tfdefines the inputs we use to declare our “bucket” infrastructuremain.tfdefines the actual resourcesoutputs.tfdefines the outputs.
We can think of our bucket module as being like a function with clearly defined inputs(variables.tf) and outputs (outputs.tf), with the innards largely abstracted for simplicity.
Defining our module does as follows simple:
variables.tf holds the inputs which we can alter in the future to deploy different websites in different projects
variable "project_id" {
  type = string
}

variable "website_domain_name" {
  type = string
  description = "Domain name and bucket name for site. ie: www.myblog.net"
}

variable "bucket_location" {
  type = string
  default = "us-west-1b"
}

variable "storage_class" {
  type = string
  default = "STANDARD"
}
main.tf holds the bucket definition configured for website hosting:
resource "google_storage_bucket" "static-site" {
    name          = var.website_domain_name
    location      = "US"
    storage_class = var.storage_class
    force_destroy = true
    uniform_bucket_level_access = true
    website{
      main_page_suffix = "index.html"
      not_found_page   = "404.html"
    }
    cors {
      origin = [ "*" ]
      method          = ["GET", "HEAD", "PUT", "POST", "DELETE"]
      response_header = ["*"]
      max_age_seconds = 3600
  }
}

resource "google_storage_bucket_iam_member" "viewers" {
  bucket   = var.website_subdomain_name
  role     = "roles/storage.objectViewer"
  member   = "allUsers"
  depends_on = [
    google_storage_bucket.static-site
  ]
}
And finally, we can (optionally) output some information on our website in outputs.tf
output "bucket_link" {
    description = "Website static site link"
    value = google_storage_bucket.static-site.self_link
}
Using the bucket module
Now we need to create a root module from which to run our bucket module.
Create a main.tf and variables.tf under prod/
Under main.tf add a Google provider and a bucket
terraform{
  required_providers{
    google = {
      source = "hashicorp/google"
      version = "4.32.0"
    }
  }
}

provider "google" {
  region = var.region
  credentials = file(var.key_file)
  project = var.project_id
}

module "bucket" {
  source = "../modules/bucket"
  project_id = var.project_id
  website_domain_name = var.website_domain_name
  storage_class = "STANDARD"
}
Notice how we can reference our bucket module with ../modules/bucket and alter some of the variables for that module.
Just like with the bucket module, we will add variables:
variable "project_id" {
    type = string
    description = "Project id"
}

variable "region" {
    type = string
    description = "Availability Zone region. See: https://cloud.google.com/compute/docs/regions-zones"
}

variable "key_file" {
    type = string
    description = "Keyfile for bucket authentication. Used for GCloud "
}

variable "website_domain_name" {
    type = string
    description = "Domain name and bucket name for site. ie: www.myblog.net"
}
Finally we will need to create a terraform.tfvars to actually populate our variables:
# Shared Vars
project_id = "mysite-123"
region = "us-west-1b"
key_file = "~/gcp/access_keys.json"

# Bucket vars
website_domain_name = "mysite.net"
Warning! For security, we generally don’t want the terraform.tfvars to wind up under source control, so make sure to put it into your .gitignore!
Also notice how we pass our key_file to terraform in this module. This key_file should correspond to your service account.
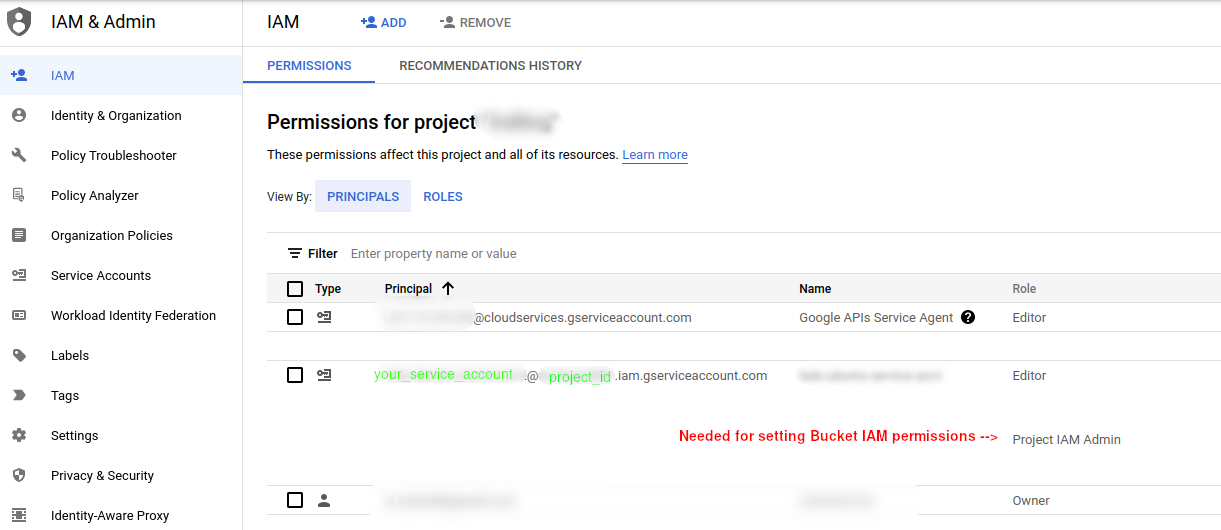
(Important) Pre-requisite - Updating service account permissions
The service account used by our IaC tool (Terraform) will need to change permissions on the bucket using IAM. Without this ability, our service account (and hence Terraform) will be unable to update the bucket permissions to be visible on the internet. This will have to be done in Google Cloud:

Deploying our bucket
The project structure should now look like:
└── terraform
    ├── modules
    │   └── bucket
    │       ├── main.tf
    │       └── variables.tf
    └── prod
        ├── main.tf
        ├── outputs.tf
        └── variables.tf
To deploy:
$ cd terraform/prodView your deployment plan
$ terraform plan -var-file terraform.tfvars -out terraform.tfplanAnd apply your plan
$ terraform apply -var-file terraform.tfvarsIf you encounter any issues at this step, you may need to confirm domain ownership with your service account
At this point, if everything went smoothly, you should see a new bucket in the Google Cloud Storage interface!

If you followed tutorial 1 of this series, you know you can upload your site with
$ GOOGLE_APPLICATION_CREDENTIALS=$HOME/gcp/my_access_keys.json hugo deploy --target=$DEPLOYMENT_TARGETNow, If you want to take down all infrastructure for your project, simply
$ terraform plan -destroy -var-file terraform.tfvars -out terraform.tfplan
$ terraform apply terraform.tfplan
Conclusion
The power behind Terraform is its modularity. Because we structured our bucket as a module, we can use it in different projects (ie: deploying different websites in different domains) simply by altering terraform.tfvars. Although our bucket example is simple enough that it does save us much time, with larger more complex projects and with multiple contributors, tools like Terraform become essential for managing infrastructure (and costs).
To learn how to use Terraform to automate CI/CD
Read Part 4 of this series -> Using Terraform + Github Actions for CI/CD.
Related Posts
Why Big Tech Wants to Make AI Cost Nothing
Earlier this week, Meta both open sourced and released the model weights for Llama 3.1, an extraordinarily powerful large language model (LLM) which is competitive with the best of what Open AI’s ChatGPT and Anthropic’s Claude can offer.
Read moreHost Your Own CoPilot
GitHub Co-pilot is a fantastic tool. However, it along with some of its other enterprise-grade alternatives such as SourceGraph Cody and Amazon Code Whisperer has a number of rather annoying downsides.
Read moreAll the Activation Functions
Recently, I embarked on an informal literature review of the advances in Deep Learning over the past 5 years, and one thing that struck me was the proliferation of activation functions over the past decade.
Read more


